Picking up a cinema camera at 8am and shooting at 9am is a risk that's almost never worth taking. Not because gear owners are dishonest — they generally aren't — but because cinema gear has configuration states, calibration settings, and firmware edge cases that the previous owner might not have reset. The camera that was working perfectly on their last shoot might be set up in a way that is completely wrong for yours.
This is the gear prep checklist we go through before every shoot involving rented equipment. It's built around a night-before pickup structure, because that's the correct approach: pick up the gear the evening before, run through the checklist, and identify any problems while you still have time to resolve them.
The golden rule: always pick up the night before
Most owners on Wedio are flexible about a night-before pickup, especially for full-day or multi-day bookings. It's worth asking at the time of booking rather than assuming. A night-before pickup typically adds a half-day or single day to your rental cost — usually 500–1,200 DKK depending on the kit — and that cost is worth every krone. The alternative is showing up to a location, discovering the media cards aren't formatted correctly, and spending your first hour troubleshooting instead of shooting.
If a night-before pickup genuinely isn't possible, allocate at least 90 minutes on the morning of the shoot for gear check before you travel to location. Do not run the check on location. Do it at home or in your studio where you can spread everything out and troubleshoot without pressure.
Camera body check
Power and battery
- Charge all batteries fully the night before. V-lock or Gold Mount batteries should be on the charger as soon as you get home from pickup. Most cinema-grade V-lock batteries take 3–5 hours to reach full charge.
- Power on the camera and check the battery indicator. Some V-lock batteries read full but have a reduced capacity due to age — check whether the camera reports actual Wh remaining if that readout is available.
- Count the batteries. If the owner listed three V-locks in the rental, confirm you have three in your hands.
Recording media
- Insert all media cards or SSDs. On RED bodies, insert MINI-MAGs and confirm they appear in the media manager. On Blackmagic bodies, insert CFast 2.0 cards or SSDs and confirm they appear in the storage menu.
- Format all media through the camera, not through a computer. Camera-based formatting writes the correct file system structure for that specific camera and clears any partial recordings from the previous user.
- Record a 30-second test clip and confirm it plays back correctly on the camera's rear screen. Confirm the file is the expected codec and resolution.
- Check remaining capacity. If you have two 256GB CFexpress cards and you're shooting BRAW 12:1, know approximately how many hours of recording you have.
Sensor and image settings
- Set the correct colour science and log format for your project. If you're shooting ARRI Log C, confirm LogC3 vs LogC4 depending on the camera generation. If shooting BRAW, confirm the colour space (Blackmagic Film or BRAW 4.6K Gen 5 depending on body).
- Check the FPS and shutter angle. A camera coming off a slow-motion shoot might be set to 60fps with a 360° shutter — obviously wrong if you're shooting at 24fps.
- If the camera has built-in ND (ARRI Mini LF, Sony FX6, Blackmagic URSA), confirm the ND is clear and the control is functioning.
- Check the crop factor or scanning mode. ARRI Alexa cameras can shoot in different sensor modes (Open Gate vs 4:3 vs 16:9) — confirm the correct one for your project before you mount a lens.
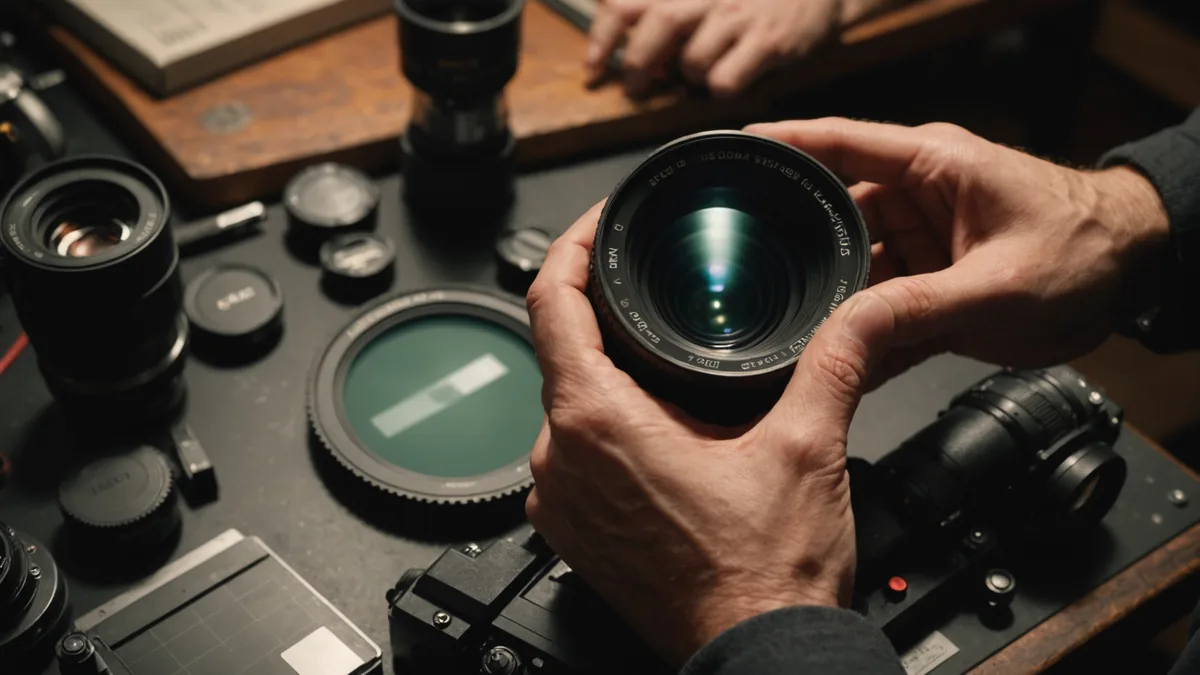
Lens check
Physical condition
- Remove the front and rear caps. Inspect the front element for dust, haze, fungus, or scratches. A small amount of front element dust is generally irrelevant to image quality. Haze or fungus inside the lens elements is a problem and should be noted with the owner.
- Turn the focus ring across its full range, from minimum focus distance to infinity. The ring should move smoothly with consistent resistance. Any notching, grinding, or loose areas in the focus ring need to be flagged.
- Check the iris ring (if de-clicked for cinema use). It should rotate smoothly. A sticky iris can cause exposure inconsistencies during pulls.
Mount and communication
- Mount the lens on the camera. For PL lenses, confirm the locking ring seats fully and the flange is tight. A loose PL mount will show as back-focus drift during a shoot.
- For lenses with electronic communication (Canon CN-E EF mount, Zeiss CP.3 XD), confirm the camera is receiving lens data — the focal length and focus distance should appear in the camera's metadata readout or on-screen display if that feature is enabled.
- Check focus at both infinity and close focus using a focus chart or a high-contrast target. The sharpest point of focus should correspond to the lens markings.
Support equipment check
Tripod and fluid head
- Mount the camera and lens on the fluid head. Confirm the balance is correct for the weight of your specific camera/lens combination. An unbalanced fluid head will fight you all day.
- Pan and tilt the head through its full range. Confirm the drag is smooth and adjustable. If the head has a switch-selectable drag (like a Sachtler aktiv series), confirm all positions work.
- Lock both axes and apply downward pressure to the camera. The head should hold without slipping.
Stabiliser
- If renting a gimbal stabiliser such as a DJI RS3 Pro or Ronin 4D, balance it with the actual lens you'll be using, not a proxy weight. Gimbal balance is lens-specific and a 85mm balanced for the 35mm will fight the motor all day.
- Update firmware before the shoot if any updates are available. Firmware updates on location are a waste of time and a stress point.
Audio check
If renting a audio recorder separately — Sound Devices MixPre-3 II, Zoom F6, or similar — test it the night before with your actual microphones. Connect the mic, confirm phantom power is on if needed, speak at a normal level and confirm the gain staging is correct. Peak levels in dialogue should be sitting around -12dBFS with reasonable headroom.
Check that the timecode settings are correct if you're syncing to camera. Confirm the sample rate and bit depth match your camera's settings if you're recording dual-system sound.
What to do if something fails
If you find a problem the night before, contact the owner immediately through the platform. Most owners would rather know at 9pm than find out at 9am when you're already at location and stressed. Common issues — a non-functioning battery, a sticky focus ring, missing cables — can often be resolved with a quick swap or a visit to the owner.
We're not saying every rented piece of gear has problems — the vast majority of rentals go through without a single issue. But the difference between "I noticed this the night before and we sorted it" and "I discovered this on set" is the difference between a smooth shoot and a difficult one. That hour of prep work the night before is the cheapest insurance you can buy.
If something is wrong with the gear that wasn't reflected in the condition report, document it with photos before you use the equipment, and flag it to the owner before the shoot begins. This protects both parties and keeps the insurance process clean if anything needs to be filed.